AHI MultiScan SDK integration guide
AHI offer an SDK (Software Development Kit) called AHIMultiScan that enables app users the ability to perform face and body scans and obtain the subsequent results through a simple interface.
We have written multiple one page example apps that are identical in appearance and functionality, that enable you, the developer, to view the code and test the functionality of the AHI MultiScan SDK with the aim to enable rapid, problem-free integration of the SDK into your app.
The AHI MultiScan SDK example apps have been written for both iOS 🍎 and Android 🤖 in multiple languages and frameworks. Here's the current list of example apps:
- Swift 🍎
- SwiftUI 🍎
- Kotlin 🤖
- Jetpack Compose 🤖
- React Native 🤖 🍎
- Flutter 🤖 🍎
Each example app is generic in appearance but consistent in functionality and function naming conventions, across all languages, frameworks and platforms.
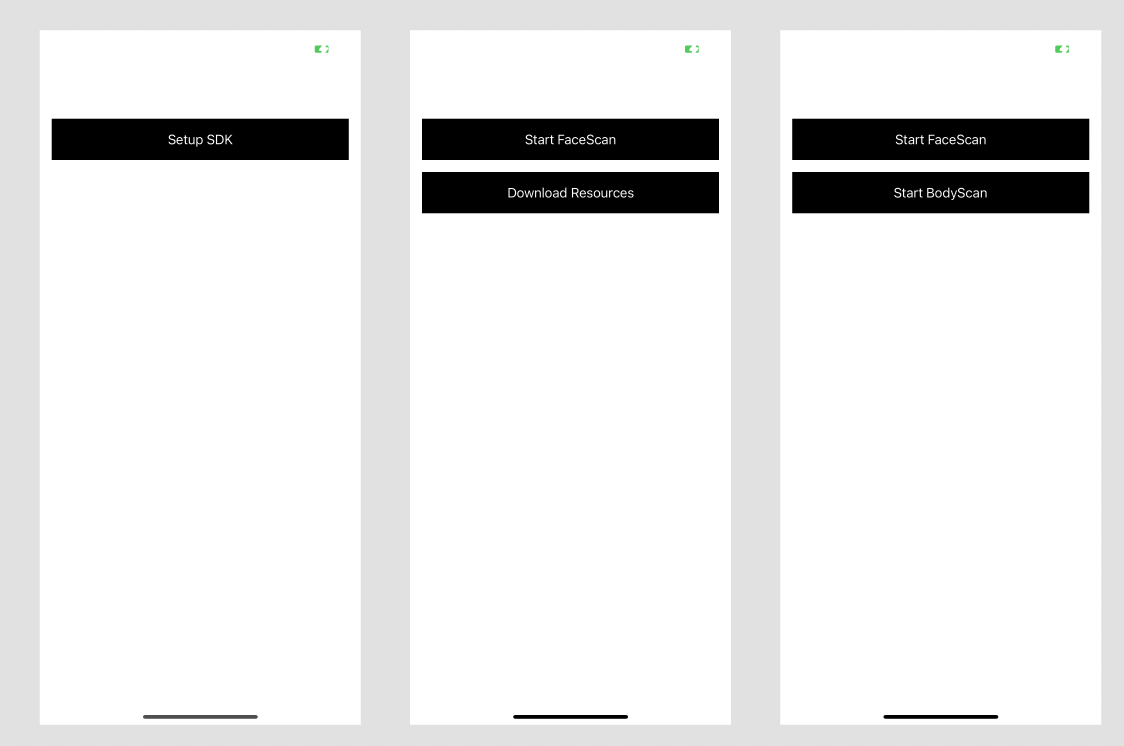
Figure 1. The 3 states of the app demonstrating primary requirements for use.
We have intentionally focused on the minimum functionality required to use the AHI MultiScan SDK with the optional and auxiliary functions also provided for convenient integration.
While there are hardware and software requirements for using our software, this guide does not touch on that; this guide focuses on how to integrate and use our SDK, with code examples found in the example apps.
Before you begin
Before you begin developing, please ensure you have the following:
- A valid AHI MultiScan Token - this should have been provided with access to the SDK.
- The Example App repository - you can access through our Code Commit repository.
- To access to our SDK repo, we grant you access with some keys and tokens. We recommend that you add these to your system as environment variables. For Android development, your gradle file (Android) will read from these and fetch the SDK's. Open the Terminal (Mac) or Command Line (Windows) and access your system variables through vim or nano by typing
nano .bashornano .zshrc(or whichever profile your Terminal or Command Line uses) and add:
export AHI_MULTISCAN_AWS_URL = URL WE PROVIDE
export AHI_MULTISCAN_AWS_ACCESS_KEY = ACCESS KEY WE PROVIDE
export AHI_MULTISCAN_AWS_SECRET_KEY = SECRET KEY WE PROVIDE
- A mobile device, ideally running the latest version of iOS or Android.
Some additional information for your development purposes:
- All function names described are consistent in each app so that you can search for them as required across all example apps.
- In your own app, you will be required to add camera access permissions.
- iOS: info.plist -
NSCameraUsageDescription = "We need to use your camera to take a scan."; - Android: manifest.xml -
<uses-permission android:name="android.permission.CAMERA" /> - Our SDK uses the Metric measurement format for all inputs and outputs. If you support Imperial or another measurement format, please ensure that you implement appropriate conversions to Metric before attempting scans.
Running the app
Pick your poison... language, framework and platform that is!
The first thing you will need to do is download and install your packages.
- Swift/SwiftUI: Cocoapods -
pod install - Kotlin/Jetpack: Gradle -
build project - Flutter:
pub get - iOS:
pod install - Android:
build project - React Native:
npm install - iOS:
pod install - Android:
build project
If you have installed the dependencies, open the project in your preferred IDE or text editor. Next, you will want to search for a property called AHI_MULTI_SCAN_TOKEN and assign the value to the token we supplied, which is of type String.
At this point, you should be able to run the app on a device and utilise the functionality.
State one: Setup SDK
The first state of the app requires you to setup the AHI MultiScan to enable performing scans. The "Setup SDK" functionality can be automated by your app as a background function, however for the sake of demonstrating the requirement, we have made it an actionable event that is triggered by the tap gesture on the button.
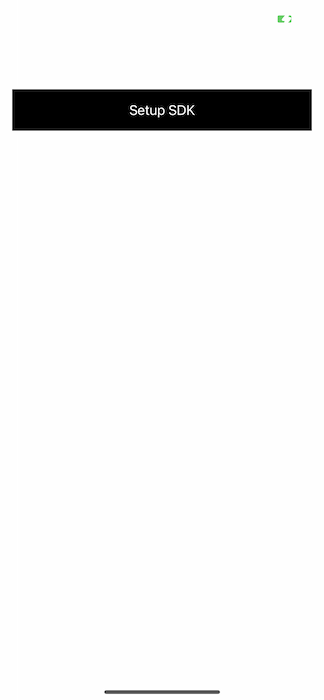
Figure 2. When you first launch the app, you should be presented with a screen displaying a single button.
The setup button performs 2 tasks:
setupMultiScanSDK- will call the AHI MultiScan SDK and pass in theAHI_MULTI_SCAN_TOKENand if this succeeds, it will callauthorizeUser- will call the AHI MultiScan SDK and pass in theAHI_TEST_USER_ID,AHI_TEST_USER_SALTandAHI_TEST_USER_CLAIMS, which are of typeString,String,Array<String>respectively.
The authorizeUser values that get passed in are hardcoded for the example app. When you integrate this functionality into your app, you will need to use your own:
USER_ID- A unique user ID which will never changeSALT- A salt string used for hashing your users data for greater privacy of their information.CLAIMS- An optional array of uniqueStrings unique to the user (i.e. firebase creation timestamp).
State two: FaceScan and Resources
If the Setup SDK process was successful, you will then see the second state containing two buttons:
- Start FaceScan
- Download Resources

Figure 3. After successfully setting up, you will have 2 options available to use.
Start FaceScan
This button invokes a function called startFaceScan which performs the following:
- We have defined a
Map(Dictionaryfor iOS devs) of hardcoded user inputs which adhere to our SDK Schema. You will need to obtain these inputs from your users via some form of user input view.- Please read our schema for more information.
- We then provide simple validation containing all the relevant rules which is a function called
areFaceScanConfigOptionsValidand returns abooleanvalue. - If the inputs are valid, we proceed to initiating the scan. Currently this is set to use the
PAYG(Pay As You Go) option. We also offer aSUBSCRIBERoption as well. You should define this value based on your agreement with AHI. - FaceScan will take control of your view and perform a FaceScan.
- The FaceScan can be cancelled and will return an Error (Exception for Flutter) and we have defined in code comments the values expected for the cancel event.
- If the FaceScan returns an error, it's handled accordingly.
- If the FaceScan completes successfully, results are printed in the logs, which adhere to the schema.
Download Resources
This button invokes the function downloadResources which performs 3 different functions asynchronously:
- AHI MultiScan SDK function
downloadResourcesInBackground- this performs avoidtype function invoking the download of resources, which are required to complete a BodyScan. - AHI MultiScan SDK function
areAHIResourcesAvailable- this performs abooleantype functiontrue- The resources are downloaded and available.false- The resources are not downloaded.
- AHI MultiScan SDK function -
checkAHIResourcesDownloadSize- this performs alongtype function which returns the size of the download in bytes. We have conveniently provided the method to convert it to MB, however it's up to you how you best use or display this information.
In the event that the resources have not been downloaded, these 3 functions have been wrapped in a very simple timed loop set to 30 seconds; these 3 functions will be called every 30 seconds until the areAHIResourcesAvailable returns true . We recommend implementing a polling mechanism in your app to provide a better User Experience.
State three: FaceScan and BodyScan
If the resources are available, you will then see the final state containing two buttons:
- Start FaceScan
- Start BodyScan
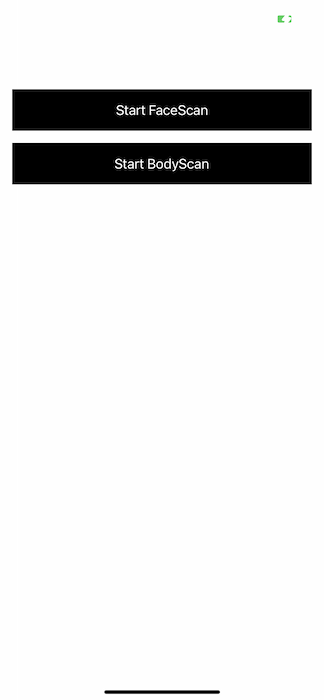
Figure 4. After successfully downloading resources, you will have 2 options available to use.
Since we have defined the FaceScan logic above, we will focus on the BodyScan.
Start BodyScan
This button invokes a function called startBodyScan which performs the following:
- We have defined a
Map(Dictionaryfor iOS devs) of hardcoded user inputs which adhere to our SDK Schema. You will need to obtain these inputs from your users via some form of user input view.- Please read our schema for more information.
- We then provide simple validation containing all the relevant rules which is a function called
areBodyScanConfigOptionsValidand returns abooleanvalue. - If the inputs are valid, we proceed to initiating the scan. Currently this is set to use the
PAYG(Pay As You Go) option. We also offer aSUBSCRIBERoption as well. You should define this value based on your agreement with AHI. - BodyScan will take control of your view and perform a FaceScan.
- The BodyScan can be cancelled and will return an Error (Exception for Flutter) and we have defined in code comments the values expected for the cancel event.
- If the BodyScan returns an error, it's handled accordingly.
- If the BodyScan completes successfully, results are printed in the logs, which adhere to the schema.
Required functionality
There are a minimum of 3 required functions in order to get scan results, but we recommend implementing the following 5 functions to perform all the available scan options.
setupMultiScanSDK
Uses your token to setup the SDK. Will return an error if the function fails or null/nil /empty String for success.
authorizeUser
Requires the 3 parameters containing a unique user ID, salt and optional array of claims. Will return and error if the function fails or null/nil /empty String for success.
downloadAHIResources
A void function that initialises the download of remote resources.
startFaceScan/startBodyScan
These functions require valid user input that adheres to the respective schema before invoking a scan session. If successful, a Map of results which also adheres to the respective schema will be returned. If it failed, a relevant error will be returned.
Additional functionality
The SDK provides several other functions that can enhance your user experience and the performance of your app.
areAHIResourcesAvailable
Will return a boolean informing you of the status of the resources availability. The resources are required for BodyScan.
checkAHIResourcesDownloadSize
Will return the download size in bytes as number value.
getBodyScanExtras
Requires an Array of valid body scan results schema containing the raw and ent values for a body scan and will return a Map object containing a meshURL with the path to a 3D avatar file.
getMultiScanStatus
Will return a status of ready , disconnected or unavailable .
getMultiScanDetails
Will return a Map containing information about your registered session with the AHI MultiScan
getUserAuthorisedState (iOS only)
Requires the current user ID and will return the authorised state for that user. This can be used to indicate whether you need to call authoriseUser .
deauthorizeUser
Will deauthorise the user from using the MultiScan service.
releaseMultiScanSDK (iOS only)
Will release the MultiScan SDK session from memory requiring setupSDK to be called again if you need to use it.
setMultiScanPersistenceDelegate
We recommend using this to provide customised results based on historical user scan data. We refer to this process as "smoothing". You need to provide the previous BodyScan scan results in the format of an Array<Map<String, Any>> via your results database.
Validation
We have implemented several functions that support validating your inputs to the SDK, which adhere to our Schemas. We recommend that you use these functions to ensure that your integration will provide the best Quality Assurance.
You will note validation occurs for:
- FaceScan input.
- BodyScan input.
- setMultiScanPersistenceDelegate results.
Your App Flow Chart
This is a generic, simple flow chart of when and how you can use the AHI MultiScan SDK in your app. View it full size.
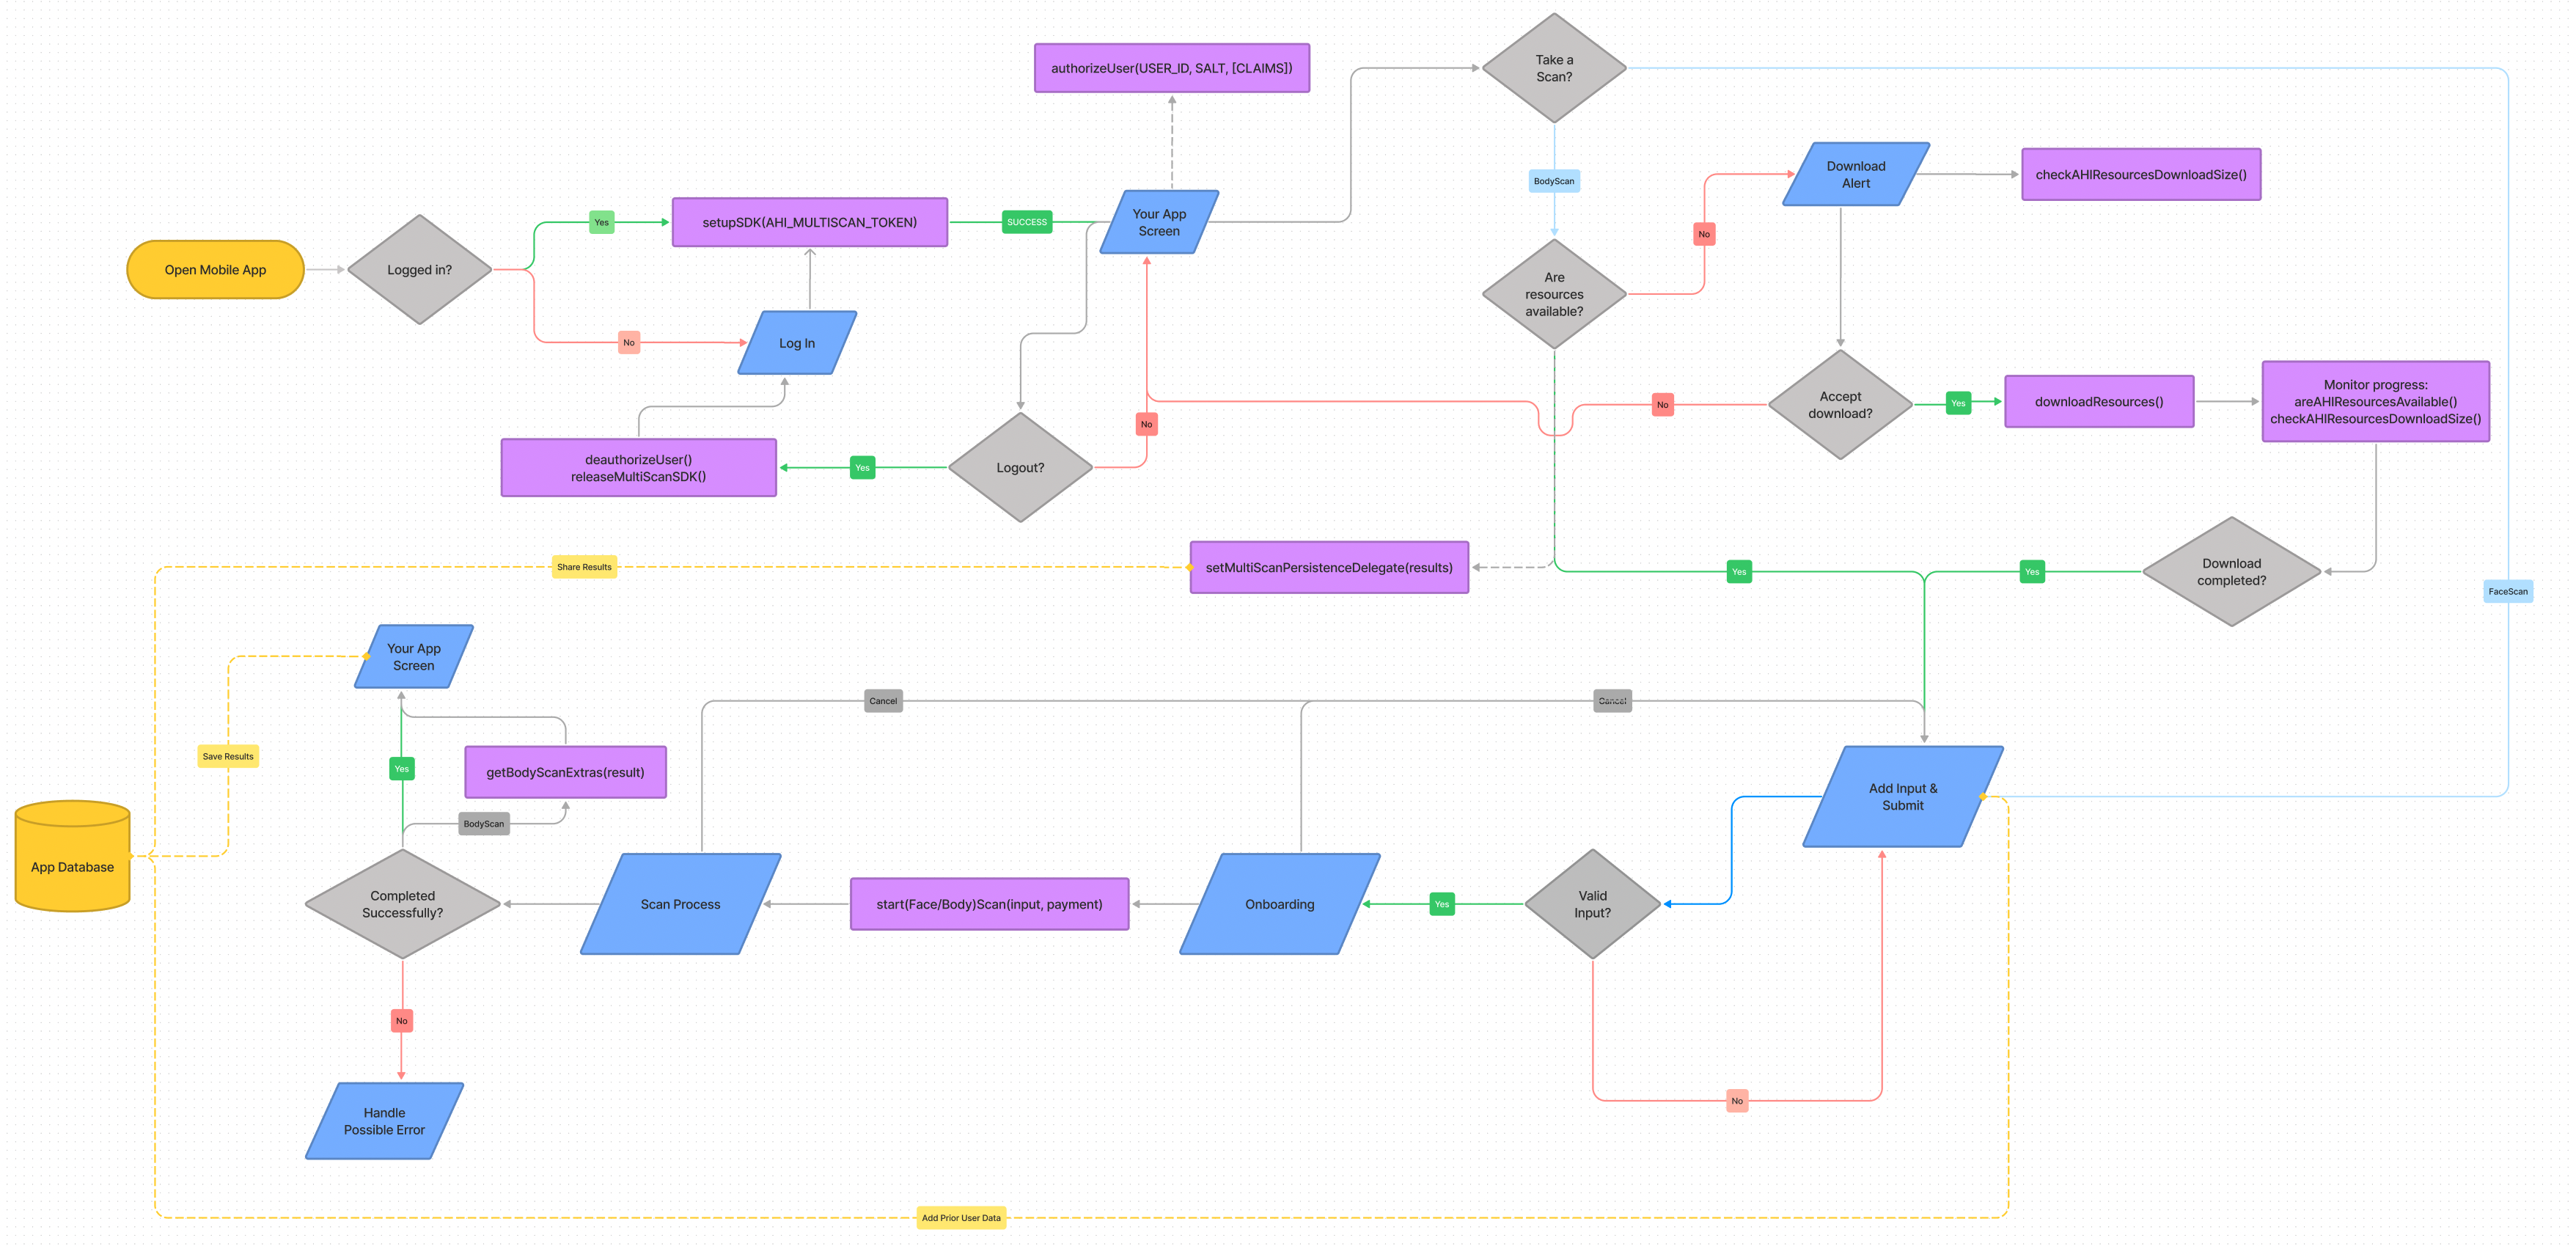
Figure 5. Generic SDK integration flow chart.
Summary
The example app demonstrates how to use the primary functionality of the AHI MultiScan SDK and how to rapidly integrate that functionality into your app.
We hope you had a smooth integration experience and we welcome any feedback you might have on the example app, the SDK or this guide.